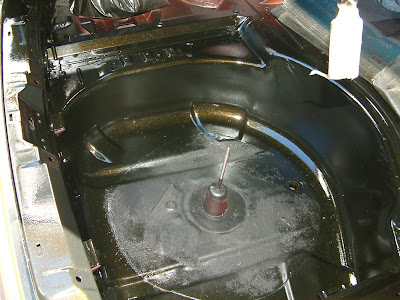
Here's how it went down as well as some pics of the results...
The equipment set up:
I had my spraying equipment set up the following way; 2Hp compressor > water trap > shortest hose I could use, about 10m long > a pressure regulator at the base of the spray gun. Ideally another smaller water trap can be used at the base of the gun to catch any moisture build up which occurs in the hose... remember the longer the hose, the more moisture will build up and get into your paint.
I brought myself a HVLP (High Volume Low Pressure) spray gun, so as you can imagine it atomises a lot of paint with relatively low pressure, so it is important to set it up correctly to ensure nice coverage while avoiding applying too much paint and causing runs. I had the gun set at 3psi, then checked and adjusted the fan coverage on a piece of cardboard before aiming it at the car.
Mixing the paint:
What I have below is just a guide, your paints and ratios may differ. Make sure you read the product information and MSDS for your paint and follow them to the T.
For mixing the paints I used a mixing cup I purchased from the paint store; these have markers on the sides so you can get your rations exact. Then I used an old clean mug to scoop the paint from the tin and an old metal ruler to mix the paint.
The base coat:
I mixed my base coat paint with medium drying thinners at a ratio of 60% paint and 40% thinners. This ratio can be altered slightly depending on ambient temperature or until you get a nice milk-like consistency of the paint as it is running off the stirring stick.
With my base coat paint mixed I poured it into the gun and began the painting process.
I tried to keep the gun about 30cm away from the surface I was painting, hitting the hardest to reach places in the back of the boot first and working my way out.
Although it is difficult amongst the nooks n crannies of the boot space, I tried to keep the gun perpendicular (at an angle of 90 degrees) to the surface I was painting. I overlapped my prior stroke by 50% until all the metal I need painted was covered.
When doing this it is important and especially difficult in tight spaces to keep the air hose from coming in contact with the painted surfaces, so be aware of it. A good idea is to sling the hose over your shoulder so it follows your arm down to the gun rather than have it hanging down.
Once the first coat was done, I waited 8-10minutes for the flash off time (as recommended by the paint manufacturer) before applying another coat. The I applied a second and third coat in the same way.
Once done I cleaned all my equipment thoroughly with general purpose thinners.
The clear coat:
Before applying the clear coat, I had to leave the base coat dry for at least 30minutes, so time for a cup of beer. The clear I used is mixed at a ratio of 2 parts clear to 1 part hardener.
A word of WARNING: the hardener for the clear contains isocyanide, a close relative of cyanide! Unless you want to die like Hitler's wife, do not mess with this stuff... wear all the protective clothing, gloves, glasses and most importantly respiration equipment.
Once mixed, I applied three coats of the clear in the same way as I applied the base coat. With the only exception being that it did not require any flash off time between coats.
Once done I cleaned all my equipment thoroughly with general purpose thinners.
The result:
Overall I am quite happy with the result, you can see the nice finish in the mirror cover photo below. I had no runs in the paint even in the hard to reach places around the hinges where I had to apply the paint quite heavily.
However there was some evidence of orange peel in a few areas of the clear. I know there are various causes of this but as this was not across all of my work, I believe this was because I had my gun too far from some surfaces I was painting.
In the end it looks good and it was a good practice run for the rest of the car... door jambs here we come!


Thanks for sharing this information. Mask your car door, hood, or trunk fast & easily by tube tape Automotive Masking Solution.
ReplyDeleteAutomotive aperture tape yield a smooth finish without hard paint edges.
ReplyDelete